KitchenGo Ticket Install - DOWNLOAD
1st Step – Connect Devices


2nd Step – Registering the Device
2.1 – Registering the 1st Station
Turn on the LS-8900 or 9550-A and launch the Ticket application. Select “Register Device”. If you have already registered KitchenGO Ticket on another machine using the same network, go to step 2.2 below.

Fill out all of the fields present on the Registration Screen, double check the email address is correct and select the EULA checkbox and select “Register Device”
The email used to register must be previously unused. If you have a KitchenGo Premium license registered with that email, a different email address must be used if you receive an error message when registering KitchenGo Ticket.

Once Registered a confirmation email will be sent using the email address that was provided at registration. Enter the code provided to finish registration of the device. If you don't receive the email, check your spam or junk folders.

2.2 – Registering Additional Stations
To add an additional station on the same network run KitchenGO Ticket on the new station and select “Join Existing”.

Next, enter the Store key found on the original device where KitchenGo Ticket was registered. The key will be located on the bottom right of the screen. On older versions prior to 2.7 you will find the key at the top left of the screen.

3rd Step – Static IP setup
The TICKET software communicates with POS software(s) via a static or reserved IP on the network.
- To configure the units IP address you will need to go to the Android OS settings.
- Select the three dots in the upper right corner for the app settings, then select “settings”, then “quit app”
- Depending on the version of Android OS you are using the network settings may be accessed slightly different.
- For Android 10, At the bottom of the screen press the
 button.
- select "settings"
- Click on “Network and Internet”
- Select “Ethernet”
- Select “Ethernet IP Mode”
- Click the “static" option
- Enter your IP address settings
Example: 192.168.0.100

- Enter the IP address for the Gateway, Netmask, and DNS if needed.
Example:
- Gateway: 192.168.100.1
- Netmask: 255.255.255.0
- DNS 1: 8.8.8.8
- Click on “Connect" to save the IP configuration.
- Alternatively, you can use the DHCP option if your IP address is reserved on your network. The goal is to be sure the IP address never changes for this device.
- Return to the Main desktop screen and Launch KitchenGo Ticket.
4th Step – KDS Station and POS Integration
This setup is done just like a configuration of a printer via tcp/ip.
Click on “Start” and then “Settings”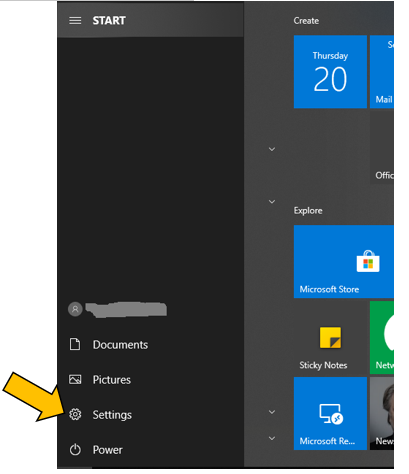
Select "Devices"

Click on “Printers & scanners”

Click on “add a printer or scanner”

Click on “The Printer I want isn’t listed”

Select “add a printer using a tcp/ip address or hostname”

Example:
- Device type: TCP/IP Device
- IP address: 192.168.100.90
- Port name: 192.168.100.90

Wait for TCP/IP port to be detected.

Click “next”

under Manufacturer select “Generic” and for Printers select “Generic/Text Only”, then click “Next”.
Name the printer and click "Next"

Select "Next"

Click on "Finish" to finalize installation.

KitchenGo Ticket detects the end of an order by the paper cut command that normally happens at the end of each print. If the POS software doesn’t automatically send this command, it must be manually configured in the printer’s properties:
Go to “Printers & Scanners” (steps 1-3 above) and locate and select the printer you installed.
Click on “Manage”.
Click on “Printer Properties”.

Select “Printer Commands”

For “End Print Job” enter the following command “<1D>V<00>”.

Click on “Apply” and then “OK” to finish.